|
|

|
NATURE’S WOOD FLOORING INSTALLATION INSTRUCTIONS-FLOATING AND GLUE DOWN
When properly installed according to these installation instructions your Nature’s Wood will not cup, buckle swell or crack due to surface water or from subfloor moisture. This product is not intended to be submerged in water, for outdoor use or for use in non- climate controlled interior applications. Mold and/or mildew growth may result from exposure to moisture and are not covered by the warranty.
OWNER/INSTALLER RESPONSIBILITY
Read these instructions completely before beginning the job. Pay particular attention to warnings and notes.
Nature’s Wood are a real wood veneer applied to a waterproof SPC (Stone Plastic Composite) core, which is not affected by water or moisture. The wood veneer is encapsulated by waterproof coatings and will not respond to changes in humidity or moisture like a regular wood product. However, wood and SPC are affected by changes in temperature at different rates. For this reason Nature’s Wood should be stored in conditions between 10 and 50 degrees Celsius. The floor must be acclimatised on the jobsite 24 hours prior to installation. Nature’s Wood, when being floated over the subfloor, is not designed to be installed in environments where the temperature exceeds 30 degrees Celsius or drops below 10 degrees Celsius. In extreme temperature deviations the floor may not be flat until the temperature returns to normal. It is advisable to glue down your Nature’s Wood in areas where deviations from this temperature range are possible. This is especially true in front of large areas of unprotected glass where direct sunlight
might increase the temperature of the floor. A 5-7mm expansion space is recommended around the perimeter of the floor.
You are the final inspector as to proper colour and product to be installed. Please inspect your Nature’s Wood for colour match to sample, grade of veneer, finish gloss and any other characteristics that you find unacceptable. If you find any deviation from the product ordered or compliance with expectations, notify your retailer immediately to address the problem prior to installation. A resolution will be sought. Once the floor is installed it cannot be returned for these problems. Manufacturer declines to pay for planks that are installed with visible defects.
We allow for 5% tolerance for grading and/or manufacturing error. The use of fillers, putty and/or touch up pens is considered normal.
PRE-INSTALLATION JOBSITE REQUIREMENTS
It is the installer/owner’s responsibility to ensure that the jobsite conditions and jobsite subfloor are environmentally and structurally acceptable prior to the installation of any hardwood floor. The manufacturer declines any responsibility for failures or deficiencies of hardwood flooring resulting from or related to sub-floor, subsurface, or jobsite environmental conditions. All substrates must be clean, flat to within 3mm in 2.0m, visually dry, and structurally sound. Nature’s Wood can be installed over most existing hard surface floors that meet these requirements, but never over carpet.
Flooring should be one of the last items installed in any new construction or remodelling.
Do not install cabinets on top of Nature’s Wood. If you have to replace a flooring board it will be very difficult. The flooring manufacturer is not responsible for cost associated with replacing floor boards that extend under cabinets or islands.
WARNINGS
CAUTION: WOOD DUST. The International Agency for Research on Cancer has classified wood dust as a nasal carcinogen. The sawing, sanding, and/or machining of wood products can produce wood dust that can cause respiratory, eye, and skin irritations. Equipment should be equipped with a dust collector to reduce airborne wood dust. Wear an appropriate designated dust mask to reduce exposure to airborne wood dust. Avoid contact with eyes and skin. In case of irritation flush eyes or skin with water for fifteen minutes. In cases of severe irritation seek immediate medical attention.
WARNING: Drilling, sawing or machining of wood products can expose you to wood dust and lead to cancer. Avoid inhaling wood dust or use a dust mask or other safeguards for personal protection.
WARNING! DO NOT SAND, DRY SWEEP, DRY SCRAPE, DRILL, SAW, BEADBLAST OR MECHANICALLY CHIP OR PULVERIZE EXISTING RESILIENT FLOORING, BACKING, LINING FELT, ASPHALTIC “CUTBACK” ADHESIVES OR OTHER ADHESIVES. These products may contain either asbestos fibers and/or crystalline silica. Avoid creating dust. Inhalation of such dust is a cancer and respiratory tract hazard. Smoking by individuals exposed to asbestos fibers greatly increases the risk of serious bodily harm. Unless positively certain that the product is non-asbestos containing-material, you must presume it contains asbestos. Regulations may require the material be tested to determine asbestos content and may govern the removal and disposal of the material.
INSTALLATION BASICS
Because buildings and adjacent floor coverings expand and contract as well the possibility for Nature’s Wood to expand due to higher indoor temperatures, we recommend a 5-7mm expansion space around your Nature’s Wood and any wall, vertical obstruction, wood or ceramic floor. NOTE: Larger rooms may require additional expansion space, 1.5mm for every 1m beyond 7.5m up to 12m maximum. Install an expansion joint with a T-Mold every 12 linear meters or alternatively glue down the product.
Your Nature’s Wood has an attached pad and additional underlayment is not generally required or recommended.
Inspect your flooring boxes to determine if you have more than one manufacturing batch number to contend with. (The batch number is found on the carton label.) Do not lay one manufacturing batch on one side of the room and another manufacturing batch on the other side of the room. Any variation between manufacturing batches will be accentuated. Instead, work from several open boxes to blend any colour or gloss differences from manufacturing batch to batch. If there are any objectionable characteristics to the owner, grade those out or cut them out when making starter pieces. Use the objectionable pieces in a cupboard or other inconspicuous place.
Undercut doorjambs/skirting boards before starting to install the floor. If possible, raise the skirting board so that the planks can be inserted under them for best appearance.
BEGINNING YOUR INSTALLATION-FLOATING METHOD
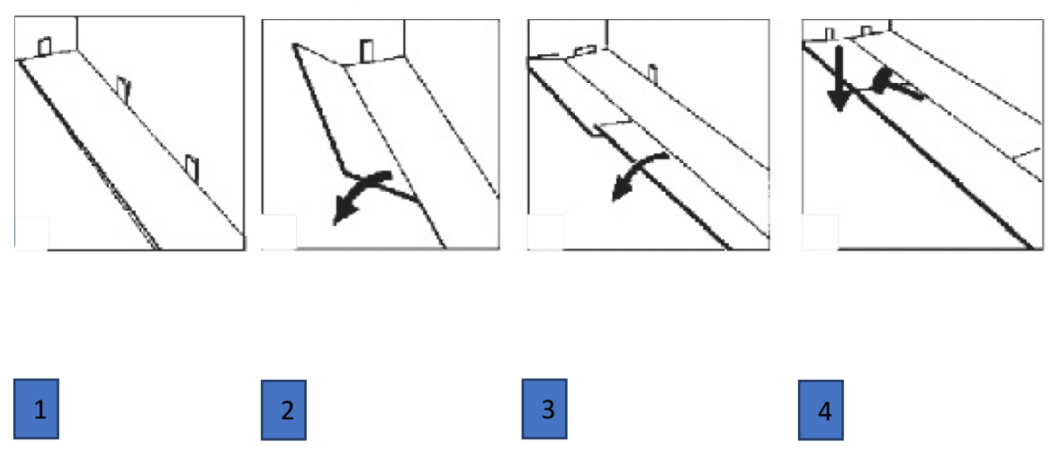
Look over your planned installation to determine the most logical starting point. Generally, this is a long exterior wall because these walls are usually the straightest and the job will run from one side to the other, clicking planks into place as you go. For best aesthetic results you usually run the planks parallel to the longest direction of the room. Chalk a line on the subfloor, one plank width, off the starting wall. If the starting wall is not straight, it may be necessary to scribe and rip the first row of planks down their length. Getting this first row of planks straight is critical to a successful job. Make sure you allow for 5-7mm, or more, expansion space in your measurements.
Use spacers along the starting wall to maintain the proper expansion space as you lay in the first row of planks with the tongue facing the
wall. Align the first plank.
Install the second plank in row one by aligning and dropping the end tongue over the end groove of the first plank. Apply light pressure to join the two planks together. Continue adding planks until the first row is in place. If needed use a rubber mallet to fully engage the short side of the plank by lightly tapping the plank about 2.5cm from the joint to engage, and sit flush, with the adjacent plank. Never tap directly on the joint.
Start the second row by cutting a plank to the desired length or select a short board from the carton to use as a starter board. Keep in mind that the board should not be shorter than 15cm to achieve the best appearance.
Install the first board in the second row by inserting the long side tongue into the groove of the first row plank. Maintain light pressure into the side seam as you rotate the plank to the subfloor. Repeat the process with additional planks as you complete each row. Very little force is needed to seat the tongue into the groove. You should feel the tongue lock into the groove.
It is critical to keep the first two rows straight and square as they form the “foundation” for the rest of the installation. Check for straightness and squareness often.
Continue installing planks and make sure to achieve a random pattern of the end joints by “racking” out the floor. You should stagger the starter boards by at least 40cm to achieve this random effect. The last boards in each row will need to be cut to length. You can use this left over cut piece to start the next row. Check that all boards are fully engaged. If gaps are found you can tap them together by using a tapping block and a scrap piece of flooring to cover the tapping block and prevent damaging the tongue and groove.
When fitting under door jambs a flat bar may necessary to assist in locking the planks into place. When fitting obstacles or into irregular
spaces a sharp utility knife can easily cut the planks. You may need to scribe a cardboard cut out and transfer this pattern onto the plank for a cutting guide.
Protect all exposed edges of the floor by installing wall mouldings and/or transition strips. Make sure that no plank will be secured in any way to the subfloor. The floor needs to be able to move. Nail the trim pieces to the wall.
In areas where moisture is expected caulk the outside perimeter with a silicone caulk.
Protect the finished flooring from direct sunlight to reduce fading and thermal expansion.
GLUE DOWN METHOD
Use only an adhesive recommended for an attached IXPE pad application and for the subfloor at hand. Not all adhesives are compatible with the IXPE pad.
Follow all the glue manufacturer’s instructions including for trowel notching and spread rate.
Install the floor using the instructions for Floating Method above but before installing the planks, trowel out enough glue to do no more than two rows of planks. To avoid getting glue on yourself and on your Nature’s Wood you need to be able to easily reach across the glue spread on the subfloor to engage and lay the planks. Some trial and error may be necessary to find the appropriate amount to put down ahead of engaging the planks.
RADIANT HEAT
Nature’s Wood can be installed over radiant heat by using either the floating or the glue down method. When gluing the floor use only an approved adhesive over the substrate in use. Radiant heat systems must have a 1.2cm minimum separation from the product. Maximum operating temperature must never exceed 27 degrees Celsius. Use of an in-floor heat sensor is recommended to prevent overheating.
Turn the heat off for twenty four hours before, during and after the installation when installing over radiant heated subfloors.
Failure to turn off the heat may result in significantly shortened open time for the adhesive.
Floor temperature must never exceed 27 degrees Celsius.
Once the installation has been completed, the heating system should be turned on and gradually increased in 0.25 degree increments until it returns to normal operating temperature.
Failure to strictly follow the adhesive manufacturer’s guidelines may result in failure and void the warranty.
COMPLETING THE JOB
Sweep or vacuum the floor.
Clean the floor with proper hardwood floor cleaner.
Install transition pieces; thresholds, stair nosings, T-Moulds, skirting boards, quarter rounds, etc. Nail moulding to the wall and not to the floor itself.
Inspect the floor for nicks, splinters, gaps and repair with coloured putty, stain pens and/or filler.
Unused material should be left with the owner to affect future repairs if needed.
Chair and furniture protectors should be applied to all items that might damage the floor in the future. Avoid dragging heavy objects or appliances across the floor.
When properly installed according to these installation instructions your Nature’s Wood will not cup, buckle swell or crack due to surface water or from subfloor moisture. This product is not intended to be submerged in water, for outdoor use or for use in non- climate controlled interior applications. Mold and/or mildew growth may result from exposure to moisture and are not covered by the warranty.
OWNER/INSTALLER RESPONSIBILITY
Read these instructions completely before beginning the job. Pay particular attention to warnings and notes.
Nature’s Wood are a real wood veneer applied to a waterproof SPC (Stone Plastic Composite) core, which is not affected by water or moisture. The wood veneer is encapsulated by waterproof coatings and will not respond to changes in humidity or moisture like a regular wood product. However, wood and SPC are affected by changes in temperature at different rates. For this reason Nature’s Wood should be stored in conditions between 10 and 50 degrees Celsius. The floor must be acclimatised on the jobsite 24 hours prior to installation. Nature’s Wood, when being floated over the subfloor, is not designed to be installed in environments where the temperature exceeds 30 degrees Celsius or drops below 10 degrees Celsius. In extreme temperature deviations the floor may not be flat until the temperature returns to normal. It is advisable to glue down your Nature’s Wood in areas where deviations from this temperature range are possible. This is especially true in front of large areas of unprotected glass where direct sunlight
might increase the temperature of the floor. A 5-7mm expansion space is recommended around the perimeter of the floor.
You are the final inspector as to proper colour and product to be installed. Please inspect your Nature’s Wood for colour match to sample, grade of veneer, finish gloss and any other characteristics that you find unacceptable. If you find any deviation from the product ordered or compliance with expectations, notify your retailer immediately to address the problem prior to installation. A resolution will be sought. Once the floor is installed it cannot be returned for these problems. Manufacturer declines to pay for planks that are installed with visible defects.
We allow for 5% tolerance for grading and/or manufacturing error. The use of fillers, putty and/or touch up pens is considered normal.
PRE-INSTALLATION JOBSITE REQUIREMENTS
It is the installer/owner’s responsibility to ensure that the jobsite conditions and jobsite subfloor are environmentally and structurally acceptable prior to the installation of any hardwood floor. The manufacturer declines any responsibility for failures or deficiencies of hardwood flooring resulting from or related to sub-floor, subsurface, or jobsite environmental conditions. All substrates must be clean, flat to within 3mm in 2.0m, visually dry, and structurally sound. Nature’s Wood can be installed over most existing hard surface floors that meet these requirements, but never over carpet.
Flooring should be one of the last items installed in any new construction or remodelling.
Do not install cabinets on top of Nature’s Wood. If you have to replace a flooring board it will be very difficult. The flooring manufacturer is not responsible for cost associated with replacing floor boards that extend under cabinets or islands.
WARNINGS
CAUTION: WOOD DUST. The International Agency for Research on Cancer has classified wood dust as a nasal carcinogen. The sawing, sanding, and/or machining of wood products can produce wood dust that can cause respiratory, eye, and skin irritations. Equipment should be equipped with a dust collector to reduce airborne wood dust. Wear an appropriate designated dust mask to reduce exposure to airborne wood dust. Avoid contact with eyes and skin. In case of irritation flush eyes or skin with water for fifteen minutes. In cases of severe irritation seek immediate medical attention.
WARNING: Drilling, sawing or machining of wood products can expose you to wood dust and lead to cancer. Avoid inhaling wood dust or use a dust mask or other safeguards for personal protection.
WARNING! DO NOT SAND, DRY SWEEP, DRY SCRAPE, DRILL, SAW, BEADBLAST OR MECHANICALLY CHIP OR PULVERIZE EXISTING RESILIENT FLOORING, BACKING, LINING FELT, ASPHALTIC “CUTBACK” ADHESIVES OR OTHER ADHESIVES. These products may contain either asbestos fibers and/or crystalline silica. Avoid creating dust. Inhalation of such dust is a cancer and respiratory tract hazard. Smoking by individuals exposed to asbestos fibers greatly increases the risk of serious bodily harm. Unless positively certain that the product is non-asbestos containing-material, you must presume it contains asbestos. Regulations may require the material be tested to determine asbestos content and may govern the removal and disposal of the material.
INSTALLATION BASICS
Because buildings and adjacent floor coverings expand and contract as well the possibility for Nature’s Wood to expand due to higher indoor temperatures, we recommend a 5-7mm expansion space around your Nature’s Wood and any wall, vertical obstruction, wood or ceramic floor. NOTE: Larger rooms may require additional expansion space, 1.5mm for every 1m beyond 7.5m up to 12m maximum. Install an expansion joint with a T-Mold every 12 linear meters or alternatively glue down the product.
Your Nature’s Wood has an attached pad and additional underlayment is not generally required or recommended.
Inspect your flooring boxes to determine if you have more than one manufacturing batch number to contend with. (The batch number is found on the carton label.) Do not lay one manufacturing batch on one side of the room and another manufacturing batch on the other side of the room. Any variation between manufacturing batches will be accentuated. Instead, work from several open boxes to blend any colour or gloss differences from manufacturing batch to batch. If there are any objectionable characteristics to the owner, grade those out or cut them out when making starter pieces. Use the objectionable pieces in a cupboard or other inconspicuous place.
Undercut doorjambs/skirting boards before starting to install the floor. If possible, raise the skirting board so that the planks can be inserted under them for best appearance.
BEGINNING YOUR INSTALLATION-FLOATING METHOD
Look over your planned installation to determine the most logical starting point. Generally, this is a long exterior wall because these walls are usually the straightest and the job will run from one side to the other, clicking planks into place as you go. For best aesthetic results you usually run the planks parallel to the longest direction of the room. Chalk a line on the subfloor, one plank width, off the starting wall. If the starting wall is not straight, it may be necessary to scribe and rip the first row of planks down their length. Getting this first row of planks straight is critical to a successful job. Make sure you allow for 5-7mm, or more, expansion space in your measurements.
Use spacers along the starting wall to maintain the proper expansion space as you lay in the first row of planks with the tongue facing the
wall. Align the first plank.
Install the second plank in row one by aligning and dropping the end tongue over the end groove of the first plank. Apply light pressure to join the two planks together. Continue adding planks until the first row is in place. If needed use a rubber mallet to fully engage the short side of the plank by lightly tapping the plank about 2.5cm from the joint to engage, and sit flush, with the adjacent plank. Never tap directly on the joint.
Start the second row by cutting a plank to the desired length or select a short board from the carton to use as a starter board. Keep in mind that the board should not be shorter than 15cm to achieve the best appearance.
Install the first board in the second row by inserting the long side tongue into the groove of the first row plank. Maintain light pressure into the side seam as you rotate the plank to the subfloor. Repeat the process with additional planks as you complete each row. Very little force is needed to seat the tongue into the groove. You should feel the tongue lock into the groove.
It is critical to keep the first two rows straight and square as they form the “foundation” for the rest of the installation. Check for straightness and squareness often.
Continue installing planks and make sure to achieve a random pattern of the end joints by “racking” out the floor. You should stagger the starter boards by at least 40cm to achieve this random effect. The last boards in each row will need to be cut to length. You can use this left over cut piece to start the next row. Check that all boards are fully engaged. If gaps are found you can tap them together by using a tapping block and a scrap piece of flooring to cover the tapping block and prevent damaging the tongue and groove.
When fitting under door jambs a flat bar may necessary to assist in locking the planks into place. When fitting obstacles or into irregular
spaces a sharp utility knife can easily cut the planks. You may need to scribe a cardboard cut out and transfer this pattern onto the plank for a cutting guide.
Protect all exposed edges of the floor by installing wall mouldings and/or transition strips. Make sure that no plank will be secured in any way to the subfloor. The floor needs to be able to move. Nail the trim pieces to the wall.
In areas where moisture is expected caulk the outside perimeter with a silicone caulk.
Protect the finished flooring from direct sunlight to reduce fading and thermal expansion.
GLUE DOWN METHOD
Use only an adhesive recommended for an attached IXPE pad application and for the subfloor at hand. Not all adhesives are compatible with the IXPE pad.
Follow all the glue manufacturer’s instructions including for trowel notching and spread rate.
Install the floor using the instructions for Floating Method above but before installing the planks, trowel out enough glue to do no more than two rows of planks. To avoid getting glue on yourself and on your Nature’s Wood you need to be able to easily reach across the glue spread on the subfloor to engage and lay the planks. Some trial and error may be necessary to find the appropriate amount to put down ahead of engaging the planks.
RADIANT HEAT
Nature’s Wood can be installed over radiant heat by using either the floating or the glue down method. When gluing the floor use only an approved adhesive over the substrate in use. Radiant heat systems must have a 1.2cm minimum separation from the product. Maximum operating temperature must never exceed 27 degrees Celsius. Use of an in-floor heat sensor is recommended to prevent overheating.
Turn the heat off for twenty four hours before, during and after the installation when installing over radiant heated subfloors.
Failure to turn off the heat may result in significantly shortened open time for the adhesive.
Floor temperature must never exceed 27 degrees Celsius.
Once the installation has been completed, the heating system should be turned on and gradually increased in 0.25 degree increments until it returns to normal operating temperature.
Failure to strictly follow the adhesive manufacturer’s guidelines may result in failure and void the warranty.
COMPLETING THE JOB
Sweep or vacuum the floor.
Clean the floor with proper hardwood floor cleaner.
Install transition pieces; thresholds, stair nosings, T-Moulds, skirting boards, quarter rounds, etc. Nail moulding to the wall and not to the floor itself.
Inspect the floor for nicks, splinters, gaps and repair with coloured putty, stain pens and/or filler.
Unused material should be left with the owner to affect future repairs if needed.
Chair and furniture protectors should be applied to all items that might damage the floor in the future. Avoid dragging heavy objects or appliances across the floor.
|
|

|
INSTALLATION GUIDELINES
Before you start read these Installer/Owner Responsibilities:
Before starting installation, it is important you read all instructions and warranty information. By starting installation of this product you are agreeing that you have read and understand all installer/owner’s requirements and responsibilities and are aware that deviating from the instructions and recommendations in this installation guide may result in voiding the product warranty.
Verify color and finish before installation. Once the floor is installed, it is deemed to have been inspected, approved and accepted.
It is the sole responsibility of the installer/owner, prior to installation, to assure that the planned installation area is suitable for laying and meets local building codes. Confirm that all subflooring is dry, sound, flat and meets or exceeds all industry standards/local building codes; as well as the recommendations listed herein. The manufacturer accepts no responsibility for product failure extending from or related to failure to meet job area/environment and subflooring requirements.
The installer/owner assumes full responsibility for the final inspection of this product. Inspection should be done prior to installation and should include: print/color/texture, factory finish and locking system. If the product is not acceptable, DO NOT INSTALL IT. Contact your retailer immediately for assistance. Flooring that has been installed will be deemed to have been inspected and quality accepted.
If you wish to install over a radiant heating system, consult with the manufacturer of your radiant heating system to ensure that it is compatible with AQUALOC flooring. Temperature must never exceed 26° C and changes in temperature settings must be gradual. Rapid temperature changes and/or excessive heat may damage the flooring and/or the finish. It is the responsibility of installer/owner to confirm the suitability of the radiant heating system for use with this product. Any damage to the floor caused by the radiant heating system will not be covered by the product warranty.
Installations in areas of potential rapid temperature change (solariums, sun-rooms, saunas, etc.) may exceed the temperature limitations of the product and void the product warranty. Verify the temperature fluctuations prior to installation to determine if the area is suitable for AQUALOC flooring.
Product is rated for indoor use only within the required temperature range, do not install outdoors.
Tools required:
EASY INSTALL
Before you start read these Installer/Owner Responsibilities:
Before starting installation, it is important you read all instructions and warranty information. By starting installation of this product you are agreeing that you have read and understand all installer/owner’s requirements and responsibilities and are aware that deviating from the instructions and recommendations in this installation guide may result in voiding the product warranty.
Verify color and finish before installation. Once the floor is installed, it is deemed to have been inspected, approved and accepted.
It is the sole responsibility of the installer/owner, prior to installation, to assure that the planned installation area is suitable for laying and meets local building codes. Confirm that all subflooring is dry, sound, flat and meets or exceeds all industry standards/local building codes; as well as the recommendations listed herein. The manufacturer accepts no responsibility for product failure extending from or related to failure to meet job area/environment and subflooring requirements.
The installer/owner assumes full responsibility for the final inspection of this product. Inspection should be done prior to installation and should include: print/color/texture, factory finish and locking system. If the product is not acceptable, DO NOT INSTALL IT. Contact your retailer immediately for assistance. Flooring that has been installed will be deemed to have been inspected and quality accepted.
If you wish to install over a radiant heating system, consult with the manufacturer of your radiant heating system to ensure that it is compatible with AQUALOC flooring. Temperature must never exceed 26° C and changes in temperature settings must be gradual. Rapid temperature changes and/or excessive heat may damage the flooring and/or the finish. It is the responsibility of installer/owner to confirm the suitability of the radiant heating system for use with this product. Any damage to the floor caused by the radiant heating system will not be covered by the product warranty.
Installations in areas of potential rapid temperature change (solariums, sun-rooms, saunas, etc.) may exceed the temperature limitations of the product and void the product warranty. Verify the temperature fluctuations prior to installation to determine if the area is suitable for AQUALOC flooring.
Product is rated for indoor use only within the required temperature range, do not install outdoors.
Tools required:
- Safety
- glasses
- Mitre saw
- Straight
- edge
- Chalk-line
- Tape
- measure
- Pry-bar
- Saw
EASY INSTALL